FMS is described in detail on the following website (outside), so here I will briefly introduce it.
Please first check with the graphic chip by operating with the keyboard.
- 1) Execute FMS, click [Controls]-[Keyboard] from the upper menu, the keyboard operation assignment is displayed.
- 2) Press "OK", you can operate with the keyboard.
Controlling with the keyboard is difficult, and the RC transmitter described below consumes the battery, so this way is best recommended.
- 1) You can use the controller attached to RealFlight G3. I think that it can be used if the controller for other flight simulator is also recognized as Windows game controller.
- 2) With the controller alone, "E-Sky Controller USB version" and others can be used.
Because there are few real stores, I will use the Internet shop. Various things come out when you search on the net. If you connect via USB, the standard OS driver will be installed automatically. After that, after calibration on Windows (see 5.2 below), you can use it if you calibrate at FMS side.
例:COM-SHOT、
Hobby King、
KAS7305、
プロポ型コントローラー、
デザイアブル 6ch ラジコン フライト シミュレーター(External link)
* Spectrum InterLink DX SPMRFTX1 for RealFlight does not recognize the up and down of the right stick in the FMS.
When you search on the net, you can find various USB adapters for the RC transmitter. There seems to be trouble, so please read the review carefully when purchasing. It seems that it can be used with the OS standard driver without including the attached disk. Set the mode of the transmitter to PPM.
ヤマダシステム、
GWS-FSM002、
SIC-HE、
Wireless_9_in1_Simulator_Adapter、
USB_Simulator_Cable_XTR_AeroFly_FMS、
USB_Simulator_Cable_All_in_One、
RCフライトシミュレータケーブル、シミュレーターケーブル USB用(External link)
Example: How to use USB Simulator Cable All in One (SAILI All-round Simulator 12 IN 1)
- Installing the driver
- Remove other game controllers such as Inter Link etc.
- The changeover switch of the adapter is 1. PhoenixRC, 2. AeroFly, 3. G4, G5, 4. XTR, but for the time being it worked with 3. Perhaps it seems that any position of the switch will move.
- If you connect the adapter to the computer, Windows 7 standard driver will be installed automatically. (It is not necessary to use the adapter included DVD-R.)
- Calibration on Windows
- Right-click [Start] - [Control Panel] - [Hardware and Sound] - [Devices and Printers] - [USB Input Devices], select [Game Controller Settings] - [Properties] - [Settings], Adjust according to the instructions.
- Channel assignment and calibration with FMS
- Configure the controller with FMS.
FMS does not support Vista or later OS. In order to run on Windows Vista / 7/10, it is necessary to clear 1 to 3 problems. There are multiple solutions to each, but if you only implement one each, it is OK. Depending on your PC, you do not need to carry out 2) 3) below, so please move first.
(There was no difference when comparing this file and original with fc command.):http://softadvice.informer.com/Fms_Simulator_For_Windows_8.html [2016/02/20])
This is a measure when the following error occurs.
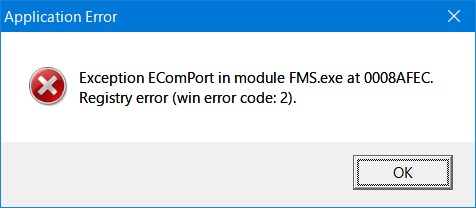
It is not an OS problem, it is because there is no serial communication port such as a telephone line modem or RS232C in the PC. However, it is not necessary physically. It seems to be necessary if there is "HKEY_LOCAL_MACHINE \ HARDWARE \ DEVICEMAP \ SERIALCOMM" in the registry. Therefore, take one of the following measures (1) (a) - (5).
- (1) Add a COM port to the registry. Since it changes registry, it is self-responsibility, please.
- (a) In the .reg file: Create .reg with the following way, and double-click .reg before executing FMS. (It is OK even if you do not execute it every time when running fast startup on Windows 10.)
- http://modelsimulator.com/forum/viewtopic.php?t=3584 (External link)
A little procedure is troublesome, but I am using the method of (1) (a).
- This is the operating procedure under Windows 7 environment.
- Right-click [Start] - [Control Panel] - [Hardware and Sound] - [Device Manager] - Right-click [Computer Name] - [Add Legacy Hardware] - [Next (N)] - Install the hardware] - [Next (N)] - [Port (COM and LPT)] - [Next (N)] - [(Standard port)] - [Communication port] - [Next (N) ] - [Next (N)] - [Completed]
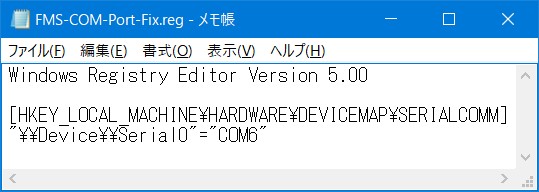
Remember the number x of "communication port (COMx)" under "Port (COM and LPT)" displayed in the device manager.
Write the following contents with a text editor, rewrite x of the part of COMx to the above x number, save the file name to "FMS - COM - Port - Fix.reg" on the desktop.
Windows Registry Editor Version 5.00

[HKEY_LOCAL_MACHINE\HARDWARE\DEVICEMAP\SERIALCOMM]
"\\Device\\Serial0"="COMx"
- 例:
- (b) Add by program. (unconfirmed)
Since this way is hard to find even if it searches, I write the URL.->The site has disappeared.
http://cmreel.com/ (External link)
http://cmreel.com/?page_id=58 (External link)
Please click "StartFMS.zip" in sentences under this page. Note that Visual Basic 5 runtime msvbvm50.dll is required for StartFMS.
StartFMS.zip (It is unknown whether it is the same as the above site):http://dai-kasegeruka.seesaa.net/article/47151311.html (External link)
Msvbvm50.exe:http://download.microsoft.com/download/vb50pro/utility/1/win98/EN-US/Msvbvm50.exe (External link)
- (2) Connect the equipment that uses the COM port. (Example: USB to RS232C Cable, GPS connected to USB, mobile phone, IF cable for setting AMP and GYRO, etc.)
- USB to RS232 Serial Port 9 Pin DB9 Cable Serial COM Port Adapter Convertor : http://www.ebay.com/itm/310707198888
- USB To Serial USB ToTTL CH340 Module : https://www.amazon.co.jp/dp/B011DT2U9A It automatically recognized on Windows 10. (It can be used for updating the firmware of DALRC QOSD.)
- (3) Add a virtual COM port. (unconfirmed)
- Please refer to the following article. Originally it redirects the virtual COM port to TCP / IP.
http://modelsimulator.com/forum/viewtopic.php?f=12&t=5906 (External link)
http://www.hw-group.com/products/hw_vsp/index_en.html (External link)
- (4) It runs on the old OS of the virtual environment. (Partially unconfirmed)
- (a) Windows XP Professional and XP mode by Windows Anytime Upgrade etc. However, because the XP mode of Windows Virtual PC does not correspond to Directinput, the USB connected controller does not work. Therefore, you need to import the virtual image of Windows XP mode with VMWare or VirtualBox. If professional / ultimate XP licensing is OK in other virtual environments. (unconfirmed)
- http://www.lifehacker.jp/2010/03/100318xpmode.html (External link)
http://blog.livedoor.jp/poisonous_fish/archives/52170788.html (External link)
- (b) Move Windows 98 / ME / 2000 / XP with VirtualBox, VMWare, etc. You must have a license for the old OS. If you set the COM port as a virtual machine, it will work even if there is no COM port on the host PC.
- In the case of VirtualBox, enable graphics 3D and COM port and USB controller in setting, enable Direct3D when installing Guest Additions, install DirectX.
- (5) Use a suspicious ? patch program (unconfirmed).
- Although there are articles below, I have not tried it because it is scary and has no comment. Therefore, we do not recommend it. Looking at the contents of the file, "d3drm.dll" and so on are written.
Skyartec FMS COM PORT Patch
- I have not checked. There is a link for FMS_Setup.exe in Manual tab.
https://www.bitgohobby.com/Dynam-6CH-USB-Simulator_p_4005.html
It is a measure when the following error occurs. One of the following (1) to (2) can be taken.
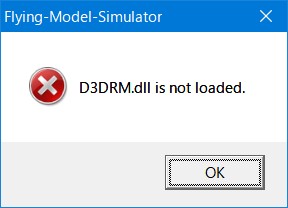
- (1) Download D3DRM.DLL or a file containing it from the net and copy it to FMS folder (eg C:\Program Files(x86)\FMS\)。
- http://www.dlldump.com/download-dll-files_new.php/dllfiles/D/d3drm.dll/5.1.2600.0/download.html (External link)
※ Because many download buttons of advertisement are displayed, please make sure not to make a mistake. "Click Here to Download d3drm.dll".
- (2) Move on the old OS of the virtual environment (unconfirmed). Refer to 1) (4).
It is a countermeasure in the case where the texture is not displayed, the screen flickers, the whole becomes whitish etc. as follows. One of the following (1) to (6) can be taken.
Before action: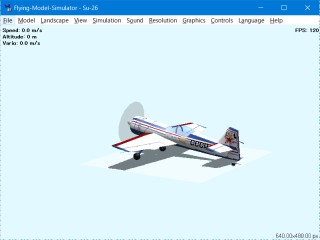 After countermeasures with photo scenery:
- (1) In the case of nVIDIA video card, use the airport of Photo Scenery for Vista.
- K&S:
http://www.ks-j.net/xo/modules/pico/content0022.html (External link) On the support page of PRO FLIGHT II there was an airport data that can be used directly from Vista, but it disappeared.
- RC-SIM.de:http://www.rc-sim.de/ (External link) There used to be a lot of airfields and aircraft including here except for FMS, but it seems that donation money has become essential for downloading.
- Praise of Sky Clouds:http://fmskatsuhiko.web.fc2.com/ (External link) There is a tool to create panoramic photo data and then airport data for FMS.
Download panoramic photos from "Flight Simulator" and airport creation tool for FMS from "Application" link to create airport data. How to use is written in "Praise of Sky Clouds", but we also have an usage in this HP.Making of photo scenery and landscape for FMS
- RC DISCUSS.COM:http://www.rcdiscuss.com/showthread.php?4355-FMS-Downloads(External link)
The data of the photo scenery here is old, so it can not be used with nVIDIA as it is. You can use it if you add some hands as shown below.
- (a) Download "MFC-Bad-SChwartau_FMS" from the article of 12-27-2008 in http: //www.mediafire.com/?m2czijzmmcg.
- (b) Extract MFC-Bad-Schwartau_FMS.zip to the appropriate folder.
- (c) Open the file with the extension .scn by Notepad etc. and add the following line above the last "END".
// for windows vista
TEXTURE fms_vista
0 254 -1 -1  -2.64
0 254 -1  1  -2.64
0 254  1  1  -2.64
0 254  1 -1  -2.64
- (d) Move all the expanded files to "C:\Program Files(x86)\FMS\Landscape".
- (e) Expand fms_vista.zip and put it in "C:\Program Files(x86)\FMS\Landscape".
- By rewriting .scn in this way, it seems that other photo scenarios can be displayed on Windows Vista or later.
Check the [Textures] of [Graphics] on the FMS menu and uncheck [Fog] and [Smooth Textures].
- Other links:FMS Forum
http://www.szenerien.de/
myrcguide.com
- (2) Uncheck the texture. (Texture is not displayed, but you can practice.)
- (3) If the GPU is nVIDIA GeForce, change it to a video card or a PC equipped with AMD RADEON HD. Although it does not guarantee the operation with RADEON, the texture is displayed on the notebook PC equipped with AMD Radeon HD6470M.
- (4) Run on the old OS of the virtual environment. (See 1) and (4) above)
- (5) Use the Application Compatibility Toolkit on Windows 7.
- Please refer to the following article. However, in my environment textures are displayed and flicker disappears though, but the frame rate got slower and it did not become usable.
http://modelsimulator.com/forum/viewtopic.php?f=12&t=5867&sid=3ca90bb271c791cefa90fd6a4e285e62(External link)
http://technet.microsoft.com/ja-jp/windows/ee461315(External link)
- (a) Install FMS.
- (b) Download "ApplicationCompatibilityToolkitSetup.exe" from the download link of the above URL and install it.
- (c) Click [Compatibility Administrator (32 bit)] in [Microsoft Application Compatibility Toolkit], and click [Yes].
- (d) Click the [Fix] icon on the toolbar, enter "FMS" for [Name of the orogram to be forced], click [Browse] and open "FMS.exe".
- (e) [Next], and select [Windows XP (Service Pack 3)] in compatibility Modes.
Then check [ForceDxSetupSuccess], [Layer_ForceDirectDrawEmulation], [WinXPSP3VersionLie] in additional compatibility modes.
- (f) [Next], [Next], [Finish]
- (g) Select "New Database ...", click "Save" on the tool bar, enter "FMS" for Database Name, give it a suitable name and save.
- (h) Right-click "FMS" of the database displayed on the screen on the right, and click [Install].
- (i) How to uninstall: Right-click "FMS" under "Per User Compatibility Setting" displayed on the screen on the right, and click [Uninstall].
- Information of Windows 8 + The Application Compatibility Toolkit
http://modelsimulator.com/forum/viewtopic.php?f=2&t=6346(External link)
- (6) For laptops with nVIDIA Optimus function, switch to Intel HD Graphics.
- - Switching way: [Control Panel] - [Hardware and Sound] - [NVIDIA Control Panel] - [Manage 3D Settings] - [Program Settings] - [Add] - Select "FMS" - Select [Integrated graphics] in "2. Select Preferred Graphics Processor".
- In Intel HD Graphics 3000, functions other than [Graphics] - [Smooth Texture] functions were displayed normally.
Uncheck "Mipmapping" in [Graphics] - [Options].
Right-click "C:\Program Files(x86)\FMS\FMS.exe" and select [Properties] - [Compatibility] and check [Disable screen scaling with high DPI setting]. The size of the letters changes, but it becomes clear.
Shadow has become pink in Windows 10 1809, nVIDIA GeForce GTX460M 391.35. When I unchecked "True Alpha" of "SHADOW" in [Graphics] - [Options], it turned black.
You can customize variously, such as adding aircraft other than the standard aircraft.
- 1) You can make models of aircraft. Also, planes and helicopters made by users are open to the public. Extract the downloaded file and save it in "C:\Program Files(x86)\FMS\Model\".
- 2) To change flight characteristics, rewrite the contents of the .par file saved in "C:\Program Files(x86)\FMS\Model\".
- 3) You can make an airfield. Also, the airport that the user made is open to the public. Extract the downloaded file and save it in "C:\ Program Files(x86)\FMS\Landscape\".
Update Nov. 27, 2016 Since Nov. 27, 2016
