This is how to make a photo field for a radio control flight simulator "RealFlight" , "FMS" and ""Phoenix R/C"" from taken pictures. You take pictures of your airfield where you usually fly your R/C aircraft, and can display the taken picture in the simulator. This picture airfield is called "Photo filed" in RealFlight or "Photo Scenery" in FMS.
An outline of the procedure is, 1) to take pictures of all direction, 2) to stitch pictures to one panorama photograph, 3) to convert panorama photograph into images for R/C simulator, 4) to add collision objects or terrain of landscape.
Scale marks are put on directions to take pictures. Although this does not need to do, it is helpful for taking take pictures very quickly and knowing angle easily later.
If the panorama head has the scale marks, and if photograph is taken by the scale marks, this mark creation work is unnecessary.
- 1) Check an angle of camera lens feild at a wide end.
- f = The focal length in 35mm film equivalent [mm]
h = 24 mm, w = 36 mm, d = SQR (24^2+36^2), x = h or w or d (tan(a/2) = x/(2*f)),
Field angle a = 2*tan^-1 (x/(2*f)) [rad] = 180/PI*2*tan^-1 (x/(2*f)) [deg]
- 2) Divide 360 degrees by 0.7 time of a field angle. Divide 360 degree by the rounded out value. The calculated value is a interval for taking pictures. The photograph which overlaps 30% or more now should be able to be taken.
- The example of an interval angle for 35mm camera (Excel2003): TripodScale.xls
- 3) Make the paper which drew the line at the above-mentioned interval angles. I drew and printed by JWCAD.
- The example scale marks for Panozaurus (JWCAD JWW file): TripodScale35.jww
Distribution origin of JWCAD: http://www.jwcad.net/(external link)
- 4) Stick double-stick tape on the paper, cut off round, and stick on the pan axis and tilt axis of a panorama head or a tripod.
* Another way "PanoCell"
This seems to be easier to decide the shooting interval.
V-Tails test version software : http://www.ac.cyberhome.ne.jp/~v-tails/delphi/panocell.html
Take photographs of all directions at the same position of lens nodal point. An example of procedure is explained below.
- 1) Take pictures at the height of a lens that shall be about 183 cm or more in RealFlight G3.5. If it has shifted, a photograph is not fit to the obstacle for a collision judging later.
- http://www.geocities.jp/aerohawk_7/realflight/(external link)
The shooting height can be written to .scn file later in the case of FMS. If the shooting height is 170cm, 1.7 wiil be written to .scn file.
- 2) The example of a setting for a compact camera with few manual functions
- (1) White balance
- A white balance is fixed.
- (2) Focus
- Since sky may fade if it is auto, it sets most photographs as infinity.
In the case of the photograph which includes a tripod or a panorama head, focus is set to an emphasizing center or a spot, in order to not focus a tripod or a panorama head.
- (3) Exposure
- When it cannot fix, it sets to multi-light measurement etc.
- (4) Pixel size
- A pixel size is about 3M pixels when obtaining the panorama image of 8192x4096 at f= 35 mm (35-mm film conversion) camera. The DDS file generated by import of RealFlight is set to 2048x2048. This is general size. A pixel size shall be raised more than 3M pixels if it is a lens of a wide angle more. By the picture of large size, the processing time in a personal computer becomes very long.
In the case of the pixel size 6.3M, the panorama image size becomes 13932x6966 at f= 35 mm. Composition of Hugin takes about 9 hours in PentiumM 1.4GHz and memory 1GB. A memory of 1GB is borderline to import, importing in RealFlight G3.5 takes about 35 minutes. The generated DDS image file size is set to 4096x4096. However, probably, 2048x2048 will be enough, since a pixel size will become fewer if it displays by RealFlight in windows xp. -> 16384x8192 panorama, 4096x4096 devided image is recomennded for after windows 7 PC, because it has more machine power.
- (5) Others
- Zoom:A wide end, Face detection:OFF, Flash light:OFF, Macro:OFF, Stabilization from shake:ON, ISO speed:Raise within a value that noise are not conspicuous, or it is AUTO (in order to prevent blur of the plants by a wind, etc.).
- 3) Take a picture of right above first.
- 4) Set tilt to one lower tilt than previous tilt, take pictures 1 round at intervals of a pan scale in the clockwise direction seeing from a top.
- 5) If it goes around, set tilt to one lower tilt than previous tilt, take pictures as same above.
- 6) Finally take a picture of right under. (It is good to also take a picture without a tripod, when erasing a tripod. If the stones or other tings are placed as the marks on a portion of the leg of a tripod, alignment procedure of picture will become easy later.
Tips
- It is better to avoid an only sky picture if possible, since a control point cannot be found and automatic arrangement cannot be performed. It is better for this reason to take pictures in a portrait position, as pictures included the ground. Please figure out a shooting angle, when the field angle of a camera lens is narrow and an only sky picture is made. It can be carried out to compound pictures by inputing angle in Hugin.
- Probably, composition of the photograph of right under will be good to compound by paint software.However, if the control point which clarified is reflected, automatic composition may be able to be carried out by carrying out trimming of the tripod part and arranging it by Hugin?
- When using neither a tripod nor a camera platform, take pictures 360 degrees clockwise from the upper row as each photograph overlaps about 30 percent. Keep the lens position is as same as possible while taking all pictures. Automatic composition may not go well and composition work becomes difficult. So don't mind displacement between pictures.
- If the position and direction of the shooting picture place are correctly checked out with GPS and compass, etc., it is easy to fit a map such as Google Earth by overlaying in "すけふれーむ(http://s-mart.rgr.jp/gc/sukegazo/(external link))" to geographical features and obstacles of an airfield of RealFlight or FMS.
- It seems that FMS cannot change the sun position. If it's shine day, it is better to take picuters when the sun is located in a high position, so that a shadow becomes natural. Since RealFlight can change the sun position, this consideration is unnecessary.
- 1) Start RealFlight, and click [Simulation]-[Import]-[Raw Panoramic Image] to import a stitched panorama image.
- 2) Edit the airfield by the edit function of RealFlight.
- The setting way is written in the page of Edit Photo Field for Real Flight G3.5.
The correction way when the horizon leans is Importing Panos for G3 of Forum of RC Universe. -- Please see A Guide (external link). Unfortunately, picture has expired in this page.
Object or terrain under 1.83m from pilot eyes posision cannot be edit, because flat face exist under 1.83.m from pilot eyes position in case of the photo field. This is a shame, but it has't be improved yet 6.5.
Please see "Making of photo scenery and landscape for FMS". Since peff.exe introduced here can move the vertices of polygon freely, it can fit a collision to a panorama picture easily.
Old edition : It is using Pano2QVR. QTVR can be made.
If you use an 360-degree camera that can easily synthesize landscape panoramic images (equirectangular panoramic images), you can shoot very comfortably. The cost performance when compared with panoramic head is very bad.
- - RICOH THETA S
- It creates a panoramic image of 5376×2688 (equirectangular panoramic image). It is better than 3584 x 1792, but the picture quality is bad.
- - Kodak PIXPRO SP360 4K
- http://www.maspro.co.jp/products/pixpro/sp360-4k/
- 2880x2880.Since the hemisphere requires two shots.
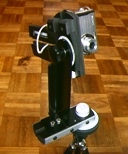 3) Panorama head (panorama camera platform)
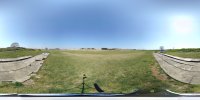
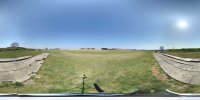
 * In RealFlight, if the file which cut the bottom 1/4 is made and it Imports by RealFlight, it will be automatically covered with a mat underfoot. Thereby, it is unnecessary to
erace a tripod which needs the time and effort. However, it seems necessary to set a height and width pixcel of picture size as the multiple of 8. 8000x3000 isn't acceptable. 8610*3060 is acceptable.
* In RealFlight, if the file which cut the bottom 1/4 is made and it Imports by RealFlight, it will be automatically covered with a mat underfoot. Thereby, it is unnecessary to
erace a tripod which needs the time and effort. However, it seems necessary to set a height and width pixcel of picture size as the multiple of 8. 8000x3000 isn't acceptable. 8610*3060 is acceptable.